MQTT Broker Event Grid
In May 2025, Custom Webhook Authentication became available on Event Grid MQTT Broker. As most of MQTT devices only support authentication with username/clientId/password, this resource became viable for Data Engine project.
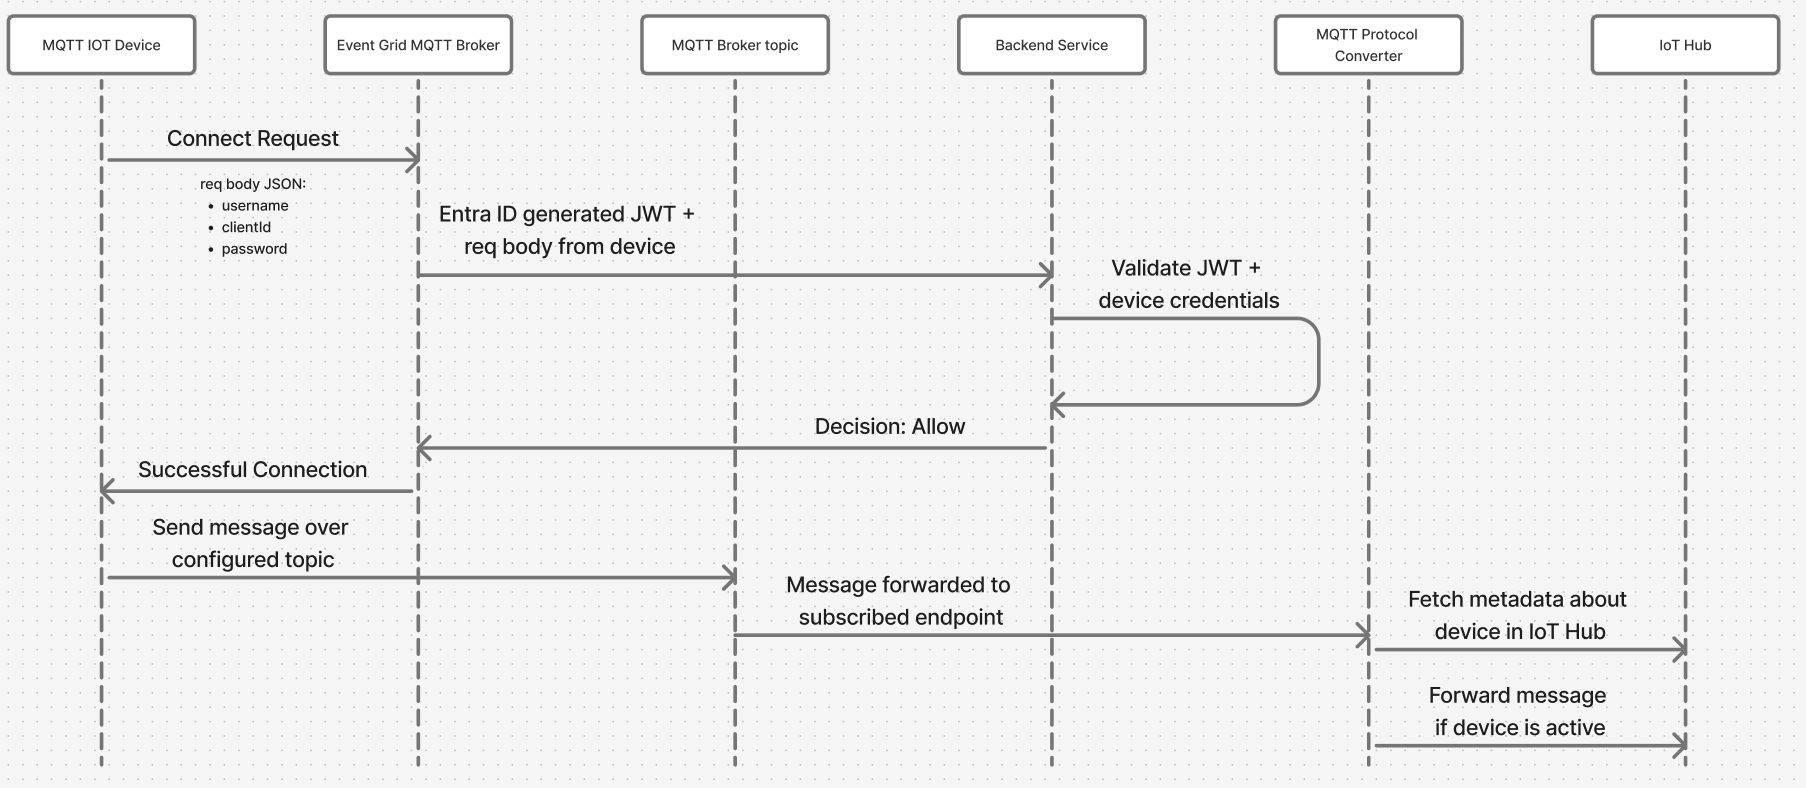
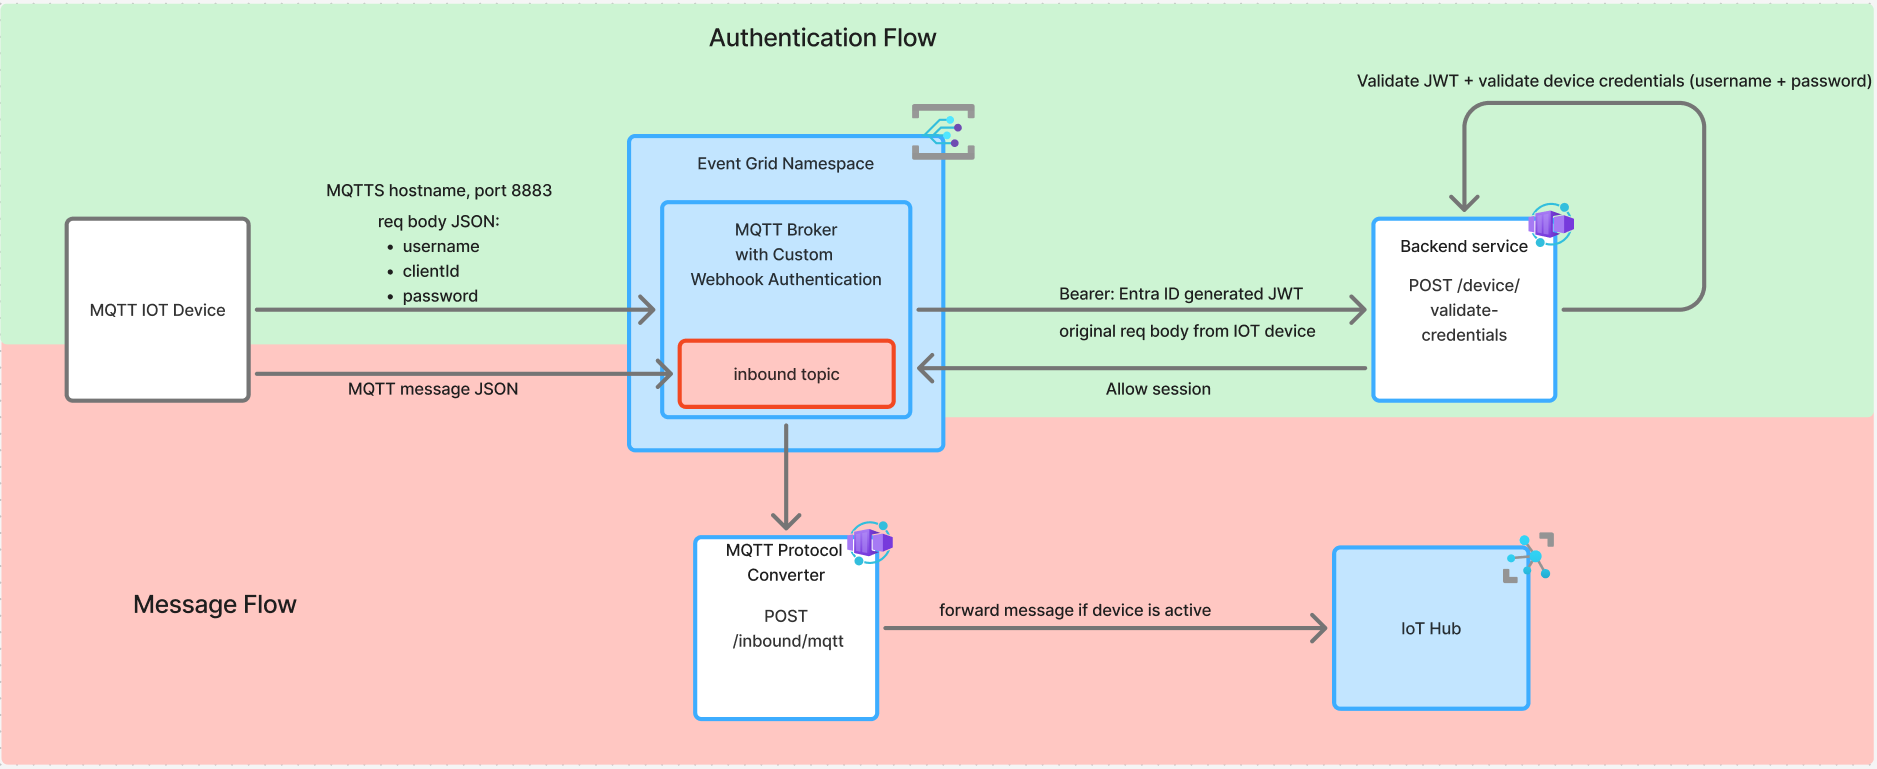
Authentication flow requires credentials served by device attempting to connect to the Broker, then they are forwarded to the indicated webhook with Entra ID JWT.
This config requires creating an Application in Entra ID. There will be an application created per environment (subscription). Currently existing only on SBX iotde-mqtt-auth-webhook-sbx, with deploying to higher envs, the applications should be created. The Entra ID Application ID URI is used as the audience claim, and Proximus Tenant ID as issuer.
On connect request Device will try to connect over MQTTS protocol and port 8883. MQTT Broker will generate a JWT and forward it together with request body of Device to the indicated webhook (backend service). Request body should consist of string fields: username, clientId, password.
Backend service is validating the JWT and then the credentials provided by the device. If both are successful, backend service will response to MQTT Broker with ALLOW decision. MQTT Broker will then allow connection from the requesting device.
Device will be able to send messages over the inbound topic. Message will be forwarded to a subscribed service (MQTT Protocol Converter). This service will fetch metadata about this device from IoT Hub, if device is active, the message will be sent to IoT Hub and then follow the standard flow of Data Engine.
On session connected, Backend service together with decision ALLOW will add clientAuthenticationName which will have value of the device name, that is found in Postgres DB.
This field will be added by Event Grid with every message sent by this device. Thanks to that, MQTT Protocol Converter will have enough information to forward message to the IoT Hub.
⚠️ When deploying MQTT Broker in Event Grid Namespace for the first time, the enrichment properties have to be commented out. As they are requiring to have a resourceTopicId (Namespace Topic ID) to have defined, but in the same time Namespace Topic cannot be deployed before namespace is deployed. So it's a bit paradoxal loop and not possible to configure it.
routingEnrichments: {
    dynamic: [
        {
        key: "username",
        value: "${client.authenticationName}"
        }
    ]
},
routeTopicResourceId: `/subscriptions/84f5ee7f-ee87-4518-bfa9-65a42b169881/resourceGroups/rg-pxs-data-engine-sbx-2d9dae4c/providers/Microsoft.EventGrid/namespaces/mqtt-broker4f37b1e7/topics/inbound`,
Custom Domain
Custom domain requires a few steps:
- Grant to
Event GridroleKey Vault Certificate Userto access theKey Vault-> standardPulumidoesn't work due to CCOE policies as it doesn't include paramprincipal-typetherefore we should use a pipelinetmpl-role-assignment-w-principal-type.ymlthere's a pipeline created for each environmentazure-mqtt-broker-to-kv.yml - A certificate should be uploaded to the
Key Vault:
- also doesn't work with
Pulumi, so use a separate pipeline templatetmpl-upload-certificate-kv.yml- it's implemented on each env (import-mqtt-certificate.yml). - the certificate should be in .pfx format. You can download a certificate from
Venafitool, inOpensslformat including root, intermediate and private key and convert it:openssl pkcs12 -export -out *cert-name*.pfx -in *cert-name*.pem -passin pass:<pass> -passout pass:<pass> - save certificate in Secure files and point to its name in the pipeline.
- Custom Domain config in
Pulumi:
- define Custom Domain:
customDomains: [
   {
       fullyQualifiedDomainName: mqttCustomFqdn,
       // certificate name is always the same as per pipeline: tmpl-upload-certificate-kv.yml
       certificateUrl: pulumi.interpolate`https://${keyVaultCoreName}.vault.azure.net/certificates/Mqtt-Broker-DNS-Certificate`,
       identity: {
           type: "SystemAssigned"
       }
   }
] - once created, go to
Event Grid- custom domains and click onValidate domainsand you'll get a popup with TXT record name and value, send those values to DNS Master Teamto set it up and also add them inPulumi.customDomains: [
{
fullyQualifiedDomainName: mqttCustomFqdn,
// certificate name is always the same as per pipeline: tmpl-upload-certificate-kv.yml
certificateUrl: pulumi.interpolate`https://${keyVaultCoreName}.vault.azure.net/certificates/Mqtt-Broker-DNS-Certificate`,
identity: {
type: "SystemAssigned"
},
expectedTxtRecordName: "_eg.dev-mqtt-iot.proximus.be",
expectedTxtRecordValue:"e065f437-16f2-446f-845d-44a9804a185f"
}
]